Rebel Blogger Template

3 commentaires


Template Name : Rebel Blogger Template

Template Author : themelib

Designer : http://wpthemedesigner.com/

Basic Instructions : How to install a Blogger template

Descriptions : - 2 Columns, wp theme,Fixed ,Ads Ready,Fresh and clean Blogger template,, Gray color background,,Nice top menu bars,Top RSS,Search gadget ,Followers,Blogroll,Achieves,
Alternative text

Netdohoa Blogger Template

1 commentaires


Template Name : Netdohoa Blogger template

Template Author : netdohoa

Designer : http://www.netdohoa.com

Basic Instructions : How to install a Blogger template

Descriptions : - 2 Columns, Fixed ,wp theme,Ads Ready,Fresh and clean Blogger template,, Gray and white color background,,Nice top 2 menu bars,Search gadget ,Followers,Friends ,Categories, Blogroll,Achieves,
Alternative text

Cool Image Hover Effect On Blogger - Popout Details

0 commentaires


I recently came across a cool image hover effect on a WordPress blog which made me to work out the codes for achieving a similar effect on blogger. The idea behind this effect is to display a short snippet/detail about the image on hover using only CSS. Many had already seen the demo on my test blog while those who did not, just take a look at the live demo by visiting the link below.

POPOUT DETAILS EFFECT ON BLOGGER - LIVE DEMO

Cool... Isn't it? Just follow the instructions given below to get a similar effect on your blog as well. Just create a back up in case something goes wrong. To do so, navigate to "Design>>Edit HTML" and click on the "Download full template" link at the top of the page. That's it!

1. Once the back up is over, paste the following piece of code anywhere between the 'body' tags on your template - probably below <div id='content-wrapper'> (or) <div class='columns fauxcolumns'>.
<ul class="columns">
 <li>
  <a href="#"><img src="IMAGE URL" /></a>
    <div class="info">
      <h2>TITLE</h2>
      <p>DESCRIPTION</p>
    </div>
 </li>
</ul>
2. Replace '#' with the link you wish to point to and 'IMAGE URL' with the URL of your image, probably with the following dimensions - 220x200px. Similarly, replace 'TITLE' and "DESCRIPTION' with the title and description you wish to have on hover, respectively. Repeat the codes within 'ul' tags for adding multiple images.
You may download the reference code, which I used on the demo site, here - Reference.
3. Let's style the above HTML with some CSS. To do so, search for the following code on your template.
]]></b:skin>
4. Paste the following piece of code just above the line mentioned in step 3.
ul.columns {
width: 480px;
list-style: none;
padding:0px;
margin-left:10px;
}
ul.columns li {
width: 220px;
float: left; display: inline;
margin-top:15px;
margin-left:7px;
margin-right:7px;
margin-bottom:7px; padding: 0;
position: relative;
}
ul.columns li:hover {z-index: 99;}
ul.columns li img {
position: relative;
filter: alpha(opacity=30);
opacity: 0.3;
-ms-filter:"progid:DXImageTransform.Microsoft.Alpha(Opacity=30)";
}
ul.columns li:hover img{
z-index: 999;
filter: alpha(opacity=100);
opacity: 1;
-ms-filter: "progid:DXImageTransform.Microsoft.Alpha(Opacity=100)";
}
ul.columns li .info {
position: absolute;
left: -10px; top: -10px;
padding: 210px 10px 20px;
width: 220px;
display: none;
background: #fff;
font-size: 1.2em;
-webkit-border-radius: 3px;
-moz-border-radius: 3px;
border-radius: 3px;
font-family:Georgia,"Times New Roman",Times,serif;
text-align:justify;
}
ul.columns li:hover .info {display: block;}
ul.columns li h2 {
font-size: 1.2em;
font-weight: normal;
text-transform: uppercase;
margin: 0; padding: 10px 0;
font-family:Georgia,"Times New Roman",Times,serif;
}
ul.columns li p {padding: 0; margin: 0; font-size: 0.9em;}
5. You need not modify anything the codes above except for the margin positions to best fit your blog. That's it! Save your template and take a look at the cool effect on your blog.

The above effect worked successfully on the major browsers which includes, but not limited to, IE, Firefox, Chrome, Opera and Safari. So, give them a shot on your blog and let us know whether you enjoyed this cool effect via comments! See you soon with another interesting tutorial. You may check out the other image hover effect here -Shadow Effect.
Inspiration for the above article - Sohtanaka.
Alternative text

Add A Free Forum To Your Blogger/BlogSpot Blog

5 commentaires


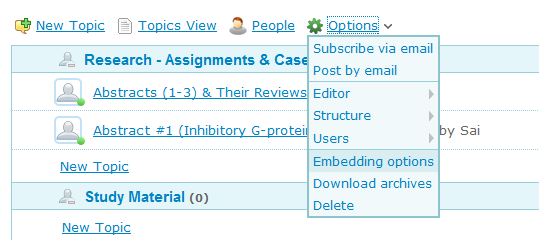
in free Blogger/BlogSpot blogs, you are not allowed to create a sub-domain or even a new directory (an online folder). So hosting a forum seems impossiblebut not anymore. Before you read any further, see these 2 examples:

1. A Blogger Blog completely changed in to a Forum.
2. A simple (static) page on a normal Blogger blog, converted to a Forum.

Instructions to Add a Forum To Your Blog
:

STEP #1:
Create and publish a new static page on your blog, exclusively for a forum. As an example, check out my forums-static-page here:

http://all4blogs.blogspot.com/p/all4blogs-community.html

STEP #2:
Create a new forum at Nabble: Free Forums at Nabble [You will do this within 5 minutes]
Copy the HTML code...


STEP #3:
Go to Blogger Dashboard -> Design -> Edit HTML and mark the tick-box "Expand Widget Tempaltes".

STEP #4:
Find (CTRL+F) this code, in your template:
<div id='content-wrapper'>

If you are not able to find the above mentioned code, then find (CTRL+F) this one (for new templates made for Blogger Template Designer)
<div class='columns fauxcolumns'>

And immediately ABOVE/BEFORE it, paste the code you got from Nabble, with this ADDITIONAL code (Highlighted in BLUE and RED):

<b:if cond='data:blog.url == &quot;http://all4blogs.blogspot.com/p/all4blogs-community.html&quot;'>
PASTE_CODE_FROM_NABBLE_HERE
</b:if>
NOTE (Important): Replace the code in RED, with the link to your forum-page.

STEP #5:
Save your temaplate.

STEP #6:
This step will HIDE everything from your blog (post content, sidebar widgets etc.) and ONLY forum will be visible in your forum-page.
Find this code in your template:
</head>
And immediately ABOVE/BEFORE it, paste this code:
<b:if cond='data:blog.url == &quot;http://all4blogs.blogspot/p/all4blogs-community.html&quot;'>
<style type='text/css'>
#content-wrapper {
display:none !important;
}
.columns, .fauxcolumns {
display:none !important;
}
</style>
</b:if>
NOTE (Important): Replace the code in RED, with the link to your forum-page.

That's it, a new forum on your blog is ready.
Now, Invite your readers and friends to join you at your forums.


NOTE: If you want to replace an entire blog with a forum, as shown in the first example (Forum In A Blogger Blog), then, first create a new blog. Download the template as a backup. Now, replace everything between the BODY tags in the template:

...
<body>
..
..
..

</body>
...

with the code copied from Nabble. So your template, code will look something like this:

...
<body>
<a id="nabblelink" href="http://n3.nabble.com/all4blogs-Demo-Forums-f6****.html">all4blogs Demo Forums</a>
<script src="http://n3.nabble.com/embed/f6****"></script>

</body>
...

And save the template.
Forums are entirely different from blogs. Forums let your readers interact with each other, create new topics/discussions and some of them even moderate the forums along with you. 
1. Forum from Wikipedia
2. The popular Digital Point Forums


Alternative text

7 Ways to Reduce Blog Spam

1 commentaires


Bloggers know that dealing with spam cannot be avoided. Every day spammers find new ways to automatically post comments to blogs, and some can even create blog posts. The technology in use by blog spammers slows your blog to a crawl, as links for all sorts of crazy things are plastered into comments all over your blog. Here are 7 ways to reduce blog spam that can help you reclaim your time and your blog’s performance.

NOTEMost of the methods discussed here will work only on WordPress based blogs. Albeit Blogger too has recently introduced its ownSPAM fighting tool, but it is still in its infancy and so I have mentioned some of the alternative tools/strategies along with the points discussed below.

1. Install and enable Akismet: The first line of spam defense for your blog is a plugin that comes with WordPress. Akismet also has an API that can be adapted to a variety of Web applications. Once this plugin is in place and active on your site, the majority comment spam will be sent directly to your comment spam folder and will never be displayed to visitors on your site. Akismet alone however won’t stop spam: some spam will get through and spammers will still be able to overload your site with their bots.
Blogger Strategy: You can use Akismet in Blogger/BlogSpot blogs, by installing alternate comment-forms (Disqus or IntenseDebate).

2. Blog comment settings: Change the number of links allowed in comments. Because comment spammers are notorious for their links, be sure that you set your blog to a low number of allowed links in comments. In WordPress, the recommended level is “1,” unless you want to have every comment go into moderation. This technique is effective in reducing the number of spam comments that are displayed on your blog, but it does not prevent access to your site by spammers. Another setting you can use to combat spam is the “Spam words” list. By creating a list of words you consider spam, you redirect all comments with those words to your comment moderation queue. In WordPress, these settings are found in the “Settings,” “Discussion,” “Comment Moderation” section of your dashboard.
In Blogger: The exact spam detection checks employed by Blogger are not known, but it does filter out some comments as SPAM with 2 or 3 active links in them. As of now, there is no publicly available list of 'Spam words' and there's no option to create one yourself for your blog. You can recommend these features to Blogger over here: Blogger Help Forum.

3. reCAPTCHA: This plugin works like the CAPTCHA images you type in all across the Internet. These things are annoying to many users because of the difficulty associated with figuring out what each image is. Still, requiring random human input before accepting a comment will stop automated spammers in their tracks.
In Blogger: You can activate CAPTCHA (word verification) at Blogger Dashboard -> Settings -> Comments.

4. Stop comments without referrers: If you are experienced at Web programming, you can modify your .htaccess file to block comments that are received from users with no referrers. There are several ways to do this and you can disable your blog if you do something wrong, so be sure to back up your original .htaccess file and only follow directions from a reputable source. You can also use a custom WordPress function to make this happen. Search the WordPress site and Google to find out all your options.
In Blogger, adding or editing htaccess files is not possible, so this is limited to WP users.

5. Close comments on old posts: In your WordPress dashboard you can go to the “Discussion” section of your “Settings” area and define the age at which posts close to comments. This reduces the amount of spam that comes to your blog and also helps keep your online community fresh.
In Blogger, you cannot completely close comments for older posts (you CAN do it manually by editing each and every post), but you can activate and limit comment moderation only for your older posts. Go to Dashboard -> Settings -> Comments and against Comment moderation select the number of days.

6. Wp-Ban will do a lot for you in the fight against spam: Rather than just routing spam comments to your spam folder, Wp-Ban actually prevents spammers from gaining access to your site. Every comment in WordPress is stamped with the user’s IP address, so all you have to do is populate a list with the adresses or domains of all your site’s spammers. This makes a huge difference in the volume of spam you get delivered to your blog: just remember however, it is not foolproof.
Again, for Blogger/BlogSpot blogs, this can be done only via Disqus or IntenseDebate.

7. Change the name of your comment file: In WordPress, almost everyone’s comment entry file is called “wp-comments-post.php.” Rename the file something different such as “wpcom.php” and then go into your WordPress dashboard to edit your theme to include the new name. Because the one file spammers look for isn’t there, they will not be able to leave spam.

Blog spam is a nuisance that rarely goes away by itself. In fact, the longer your blog is operational, the more spammers will attack your site. Use these 7 ways to reduce blog spam and get some relief. Be sure to try more than one of these methods to maximize the amount of spam you block.
If you are working on Blogger/BlogSpot platform and comments-SPAM is a serious problem on your blog, then I would advise you to switch to either of the freely available alternate comment-forms (Disqus or IntenseDebate). You can read more about their SPAM-fighting strategies here: Disqus & IntenseDebate.
Alternative text

Latest Blogger Templates Adopted from Wordpress

0 commentaires


Latest Blogger Templates
Latest Blogger Templates Adopted from Wordpress

While surfing about latest blogger templates i got so many fascinating and elegant wordpress adopted blogger templates, really fresh and free. below are the templates for different categories of blogs like Technical blog, web design blog, vibrant blogs, woody templates and elegant themes.


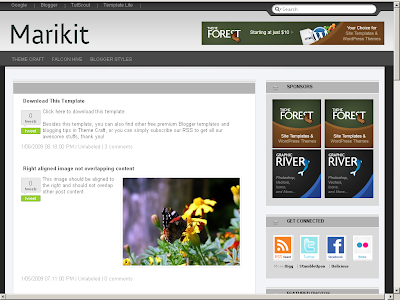
Marikit:

Marikit Blogger theme

Description : in 2 Columns, Magazine, Professional, Right Sidebar, Support Available - Marikit is a feature-rich magazine Blogger template with extremely elegant design. Converted precisely into Blogger template by Alvaris and Cloud, thanks to professional designer PaddSolutions.com!
Demo | Download

Woody:
Woody Blogger Theme

Description : in 2 Columns, Art, Nature, Right Sidebar, Support Available - Woody is a nature-styled Blogger template with artistic and elegant design, which is suitable for major kind of blogs. Full credit goes to my favorite designer, Skinpress.com.
Demo | Download

WinPress 7:
WinPress 7


Description : in 2 Columns, elegant, Tech, Right Sidebar, Support Available - As Microsoft has released my beloved Windows 7, I decided to release a Windows 7 template called Winpress 7 Blogger template for you, thanks to designer EZWPthemes.com!
Demo | Download

Shopaholic:
Shopaholic Blogger theme


Description : in 2 Columns, Left Sidebar, Support Available, Urban - I must claim myself as a shopaholic for web design related stuff, so I created this Shopaholic Fever Blogger template for all shopaholic like me, thanks to designer EZWPthemes.com!
Demo | Download

Rainbow:
Rainbow blogger template


Description : in 2 Columns, Art, Right Sidebar, Support Available - Same as its name, Rainbow Blogger template features a design fulfilled by vibrant rainbow color. I have a nice feeling for this Blogger template, and requested Alvaris to convert it into Blogger template. Credit to vibrant designer, Skinpress.com.
Demo | Download

Masunurin:
free masunurin blogger theme


Description :in 2 Columns, Magazine, Professional, Right Sidebar, Support Available - Attracted by its simple yet elegant design, Alvaris has brought Masunurin Wordpress theme into Blogger template. We appreciated original designer, PaddSolutions.com’s work very much!
Demo | Download
Alternative text


Sponsors

Protected by Copyscape Web Copyright Protection

All For Blogs. Copyright 2011 All Rights Reserved powered by Revolution Church Theme hosted on Blogger